Showing posts with label pumpkin. Show all posts

Monday, October 31, 2011

Pumpkin Cheesecake Cupcakes!

Whew, 2 years later, welcome back!!

Is there a better way to start the comeback than with one of my absolute favorite recipes?? I think not!
I first saw this recipe in a Rachael Ray Magazine in November of 2009 (which, coincidentally, is when I wrote my last blog post!) Once I saw it, I just couldn't get it out of my mind. I mean, can you blame me??

pumpkin_cheesecake_cupcakes


Since I first made them, I've made these babies multiple times for multiple functions and have had them requested more than any other baked good. So I strongly suggest you take down this super simple recipe and share the love!

(The frosting Rachael included with the recipe got mixed reviews from other bakers, so I scrapped it and used cream cheese frosting, instead!)

Pumpkin-Cheesecake Cupcakes
(adapted from Rachael Ray Magazine, November 2009)
makes 24

Ingredients:
2 8oz. Bricks of cream cheese, at room temperature
1 c. Confectioners' sugar
2 Egg whites
3 tsp. Vanilla extract
3 c. Flour
4 tsp. Pumpkin pie spice
3 tsp. Baking powder
1 tsp. Salt
2 c. Canned pumpkin puree (NOT pumpkin pie filling!)
4 eggs (can be substituted with 2 c. Unsweetened applesauce)
2 c. Granulated sugar
1 c. Vegetable oil (can be substituted with 1 c. Unsweetened applesauce, unless eggs have been substituted)

Directions:
1. Preheat oven to 350°. Line 2 12-cup muffin pans with cupcake liners. (bonus points if you can find some with pumpkins on them!)
2. Use an hand-held or stand electric mixer to cream together the cream cheese and confectioners' sugar in a small bowl. Rachael says it takes 3 minutes, so I usually take her word for it and leave it on while I'm prepping the other ingredients. (The joys of a stand mixer!)
3. Beat in egg whites and 1 teaspoon of  vanilla. Set aside.
4. In a medium sized bowl, add the flour, pumpkin pie spice, baking powder, and salt. Whisk until ingredients are well-dispersed.
5. In a large bowl, add the pumpkin puree, whole eggs, sugar, oil, and the other 2 teaspoons of vanilla. Mix together until blended. (It'll taste better than it currently looks, I promise!)
6. Slowly add the flour mixture to the pumpkin mix, until both are completely blended, but do not over-mix.
7. Using a small ladle or ice cream scoop, layer the cupcake liners with 1/3 pumpkin mixture, 1/3 cream cheese mixture, and finish with another 1/3 pumpkin mixture.
8. Bake for about 25-30 minutes, and check for doneness (totally a word) by sticking a toothpick in the center of one of the middle cupcakes. If it comes out without anything on it, they're done!

Now, as I mentioned, I don't use Rach's frosting. I have quite an affinity for all things cream cheese, so obviously cream cheese made it on top of these cupcakes! Besides, cream cheese frosting is one of the easiest frosting's to make, and hardest to mess up -- double score!

Cream Cheese Frosting

Ingredients
1 8oz. Brick of cream cheese, at room temperature
1 c. Butter, at room temperature (2 sticks)
4-6 c. Confectioners' sugar (depends on taste preference)
2 tsp. Vanilla extract

Directions
1. Beat together the butter and cream cheese. Lower the mixer speed to the lowest possible speed, and begin adding the confectioners' sugar about 1/2 cup at a time, to taste. When it's your preferred flavor, add the vanilla and mix on high for 30 seconds.

And voila! Delicious Pumpkin Cheesecake Cupcakes!


Next up: Whole Wheat Apple Cinnamon Cupcakes!

Tuesday, October 13, 2009

well, hallo, cupcake!

So first, let me gush about how much I am loving this background!! Cupcakes are quickly becoming my favorite thing to make. Think about it. You've got a perfectly proportioned piece of cake, with the perfect amount of icing, and no messy cutting involved! ANNNND, it comes in its own handy-dandy wrapper! Hellooooooooo, cupcake!!
But this post isn't about cupcakes. Well, a little, but it's mainly about cake.

I don't know about you, but every year I get so excited about Fall. I like that the weather gets a little cooler, reminding me that Winter is on its way, and of course the leaves changing color are awesome, but mostly, I like

pumpkin.


Yup, pumpkin. Pies, especially. And bread. Pumpkin bread is deeeeelish. What could be better than both of them put together???

A pumpkin spice cake that looks like a pumpkin. I mean, duh.
(Doesn't L's table look super cute??)


So BLT had a Oktoberfest/Halloween party this past weekend, and I (por su puesto) offered to make dessert! I had this perfect little ditty in mind and couldn't wait to make it.

First, I got out my new favorite baking cookbook, Cake Mix Creations by Taste of Home. Now, most of you probably won't ever buy a baking cookbook (most normal people don't) but if you ever do, BUY THIS ONE. It's the perfect kind of book for a lazy baker. You want your cake to taste amazing, but don't feel like spending 3 hours prepping, mixing, and baking? Shockingly,
neither do I! I'd rather spend my time on more important things, like decorating! And eating!

So, here it is, my (slightly modified) version of the Pumpkin Spice Cake.

PUMPKIN SPICE CAKE
2 18 1/4 oz boxes of spice cake mix (I used Betty Crocker, but only because she was on sale. I'm not picky.)
6 eggs
1 15 oz can of solid-pack pumpkin (I think that means use real pumpkin, not pre-made pie filling.)
2/3 cup canola oil
2/3 cup evaporated milk (They didn't specify a fat content, so I used low fat. Turned out FINE.)
1 12 oz bag of vanilla chips (I used chocolate, because they taste better. Simple.)
2 cans vanilla icing (I used buttercream, again, because I think it tastes better. Also, Betty, but also because it was on sale.)
1 cup flaked coconut
food coloring

In a large bowl (AKA the bigger bowl on my mom's awesome stand mixer) I mixed the 2 cake mixes, the pumpkin, the milk, the eggs, and the oil, in no particular order. I beat them for about
30 seconds on low, then bumped it up to medium for around 2 minutes. (J asked what would happen if I threw it up to 10. I told him I'll show him in his kitchen sometime - where he can deal with the mess.) Then I mixed in the chocolate chips (a few mysteriously disappeared...) on low.
Next up, baking. First, two very greasy muffin cups each got some cakey love. Then, this lovely heirloom from Grandmom Lulu
got greased up and loaded with some batter. (I could only bake one half of the cake at a time, because I didn't have a matching bundt. It took FOREVERRRRRR)

Pop 'em all in the oven at 350 for around 20 minutes for the cuppies, and 40-45 for the bundt.

Then have a dance break.


When the baking is finished, take everyone back out and let them cool. I let them cool overnight because I am incredibly impatient and knew that I would try to start icing while one or all were still warm. So I restrained myself. (Barely)

The next morning, I leveled off my cakes (which is much harder than it sounds) and smeared some buttercream on the top of one. I plopped the other bundt on top, and make sure they were sturdily held together. They were. Phew. Then, came the coloring!
On the box of the food coloring, the mixture for orange is supposed to be 12 drops of yellow to 4 drops of red. For one can of frosting. I used about 1 and 2/3, and still had to use 42 drops of yellow and 14 drops of red. So, as long as you keep the right ratio, you'll get there eventually. Once it was nice and orangey, I began icing. Toooootally harder than I originally thought, mainly because the bundt I used has many little ridges, and I had to make sure the icing got in all the
little crevices. When I was done though, it looked GOOOOOOOD. Then, I leveled off my cuppies, and plopped one of them right-side-up into the middle of the bundt, to act as a plug. I threw a little icing on there, and smooshed the other one upside-down on top of it. Perfect!
Next up: The Secret!

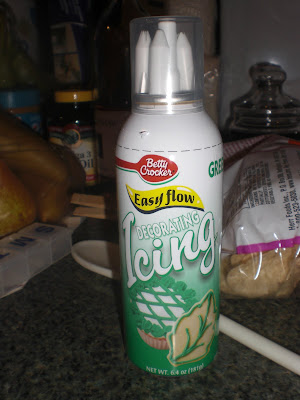
I love Betty Crocker. She invented this awesome little doohickey
which makes it impossibly easy to do icing. I just pumped a little of the icing out of the hair-mousse-like can, and smeared it all over the top cuppie for the stem. Then, I used the round tip to just make squiggly vines all around the pumpkin, growing from both the stem and the base. And then came my favorite part.
This thing has 4 different tips to use, one of which happens to be the leaf tips. Leaves are super easy and super fun to make. I'm pretty sure I had at least 3 times as many leaves on the vines as was necessary, but I couldn't help myself! Look how cute they were!

(I hate that you can see a little of the white icing peeking out the top, but hopefully you will be distracted by the adorable leaves....)

Last step was to dye a little coconut green and sprinkle around the base as grass!
Bon Ape Tit!

Next post:
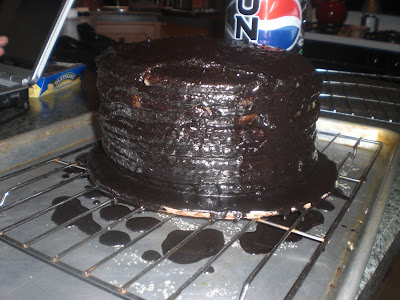
12 Layer Cake!