Get out there and vote!!
Saturday, October 31, 2009
Voting Has Begun!!
The voting for this month's Iron Cupcake:Earth challenge has begun!! Go vote for me and my "Banana Split for My Baby" cupcake, and take a look at the other baker's submissions as well! Voting continues until November 5th!!
Friday, October 23, 2009
Iron Cupcake: Earth - Music Edition!
Well, all kinds of excitement this month. I joined the Iron Cupcake:Earth challenge, and of course this month the theme was "music." Normally it's something like "savory" or "cheese" but this month, since it is the beginning of IC:E's 2nd year, they decided to try to get Ellen Degeneres to invite us to her show!
So the challenge was to create a cupcake based on a song title. Way more difficult than it sounds, I promise. So I thought for days, and consulted my brain trust. Luckily, my dad, Mr. Mike, loves strange challenges and sent me a website of songs with food in them. On that list was a song that my sisters and I used to love dancing around the kitchen to, and was just the perfect song for this challenge. Maybe you've heard it?
So, a banana split for my baby. Shouldn't be too hard, right? Well, it wasn't terrible, but it definitely took some creativity on my part. Which, really, is what this challenge is all about, right? So, I made a "neapolitan" cupcake, with a vanilla chocolate strawberry batter, topped with all the typical toppings of a banana split - pineapple, strawberry, chocolate syrup, nuts, and a cherry! And to hold it all together, banana cream frosting! So, here are my banana split cupcakes!
Banana Split Cupcakes
(cupcake recipe adapted from "The New Best Recipe" Cookbook)
Their recipe makes 12 cupcakes, so I doubled it for 24. These are the doubled measurements.
3 cups flour
2 cups sugar
3 tsps baking powder
1 tsp salt
2 sticks butter, softened (I stuck mine in the microwave for a few seconds)
1 cup sour cream
2 eggs
4 egg yolks (in addition to the 2 whole eggs)
These are my additions:
1 tsp vanilla extract
2 tsps strawberry extract (can be found at Wegman's, Whole Foods, and some Walmarts)
1 cup semisweet chocolate chips, melted
5-6 drops red food coloring
First, preheat your oven to 350. Place your baking cups into the baking pans and set them aside. I got these super cute ones from Wegman's - how cute??
Whisk together the flour, sugar, baking powder, and salt. Beat in the butter, sour cream, eggs, and yolks. Then, separate batter equally into three bowls. Into the first bowl, mix in 1 teaspoon vanilla extract. Into the second bowl, mix in the strawberry extract and red food coloring. The extract amount wasn't entirely exact, so just go with your nose - I added strawberry until the batter smelled like strawberries. Then, add red food coloring, a couple drops at a time, until the batter is nice and pink. For the third bowl, melt about a cup of semisweet chocolate chips, and stir them in. I started with about a 1/2 cup of chips, but they didn't really make the batter look chocolatey enough, so I added some more.
Once everyone is mixed up, begin spooning the batter i
nto the cupcake liners. I used a small dinner spoon to measure my batter. I layered the batter:
strawberry
chocolate
vanilla
Once all the batter is in the cupcake pans, place the cuppies in the oven for about 20-24 minutes. Mine took about 25 minutes to cook and brown on the top a bit. When they're done, take them out of the oven, and let them cool.
Banana Cream Frosting
(found on eHow)
I also doubled this recipe for the frosting.
1 cup of butter
2 medium banana
6 cups confectioner's (powdered) sugar
1 tsp vanilla extract
Beat the butter until smooth. (I softened mine a bit before throwing it in the mixer) Slice the banana and add to butter, beating again until smooth. Add confectioner's sugar, one cup at a time, until blended. Add vanilla extract and mix until blended. (I had to chill mine after this step in order to get it to the right firmness, but I think I might just have worked with the butter for a little too long.)
To assemble:
Put a smear of pineapple topping on the cupcake, followed by a smear of strawberry topping. Follow with a healthy dollop of banana cream frosting. To finish, add chopped walnuts, chocolate syrup, and, of course, a cherry! Bon Apetit!


Don't forget to vote for Iron Cupcake:Earth starting October 30, on No One Puts Cupcake In the Corner!
I am competing for these prizes:
Whoo Hoo!
Monday, October 19, 2009
twelve layers!!
Fun Fact: 12 is only 1 more than the number of runs the Phils scored last night against the Dodgers. Oh, and 12 more than the Dodgers scored. Just sayin'.
But, even better, 12 is the number of layers in this delicious cake I made! I originally got the idea from Bakerella, but wasn't sure if I wanted to make a Southern 12-layer cake, or a traditional German baumkuchen. In the end, I decided to make the 12 layer cake, mostly because I didn't have a spit to bake my cake on. :/
So here, it is, the delicious, deceptive 12-layer cake!

(Semi-Healthy) Twelve Layer Cake
3 1/2 cups whole wheat flour
1 cup all-purpose flour
1 1/2 tsps baking powder
1/4 tsp salt
1 1/2 cups butter
2 1/2 cups Splenda/sugar mix (if you're just using sugar, it's the same measurement)
6 large eggs
3 cups milk
1 1/2 tsps vanilla extract
icing/glaze
1 1/2 cups Splenda (if using the mix or sugar, use 3 cups.)
1/2 cup unsweetened cocoa powder
1 cup butter, cut up
1 can evaporated milk (what in the world is evaporated milk? I always expected it to be powdered. ya know, evaporated. but it's a liquid. what gives?)
1 tbsp vanilla extract
So, there are a few different ways you can go about baking this awesome cake. Bakerella calls for an individual disposable pan for each layer. This recipe calls for 4 identical cake pans cooked in 3 batches, which is what I used. Luckily, Grandmom Lulu came to the rescue yet again, and I was able to use the 2 9 inch cake pans from her with my mom's 2 round cake pans.
But first things first. If you're like me, your oven takes FOOORRRRRREEEVVVEEERRRRRRRR to heat up. If that's the case, turn it on before you even get your ingredients assembled. That way it'll finally be ready to go by the time you're ready to start baking. For this cake, heat it up to 375.
To start, sift your flour into a bowl with the other dry ingredients (except the sugar) and get them all mixed up and confused. Set them aside. Then beat together the butter and the Splenda/sugar mix. The recipe says to mix them "until light in color and texture." I'm not really sure what that means, so I mixed it until it looked like it was pretty well mixed.
Then add the eggs one at a time. If you're lucky like me, and your mom lets you use her stand mixer (or if you're really lucky and have your own - jealous) then you can just leave the mixer running and just crack them in while it's going. Next up, add in the flour and milk in alternating groups, going flour milk flour milk flour. Lastly, add in the vanilla.
When it's all mixed into a nice little batter, it's time to spoon it into the pans. I just used some Baker's Joy and skipped the whole parchment paper/flour deal and they still worked out. The recipe says to put a "scant" cup into each pan, but I accidentally grabbed the 1/2 cup, so I just heaped that and it worked out just the same. Smear the batter around the pan so it sits in an even thin layer, and throw all 4 in the oven at the same time. Bake for about 12-15 minutes, until the cake comes loose from the sides. Cool in the pan, then flip them out onto a rack.
Once you put the final batch in the oven, start making the glaze. Put the sugar, cocoa, butter, and evaporated milk in a saucepan and bring to a boil. Lower the heat and cook until the sauce thickens. It's supposed to thicken until it's the consistency of chocolate syrup, but mine never did. Add the vanilla, stir it up, and set aside to cool and thicken a little more.
When it's go time, just start stacking. Place a layer on a cake board, and pour just enough glaze to cover it. Throw the second layer on the first and glaze that one. Rinse and repeat until all 12 layers are on board.

Pour the rest of the glaze over the top of the cake and make sure all the sides are covered in chocolate deliciousness.

Now this is where the original recipe ends. However, I stole one more step from little miss Bakerella and used some canned (gasp!) dark chocolate fudge frosting to cover the outside of the cake and hide the layers.

Next Up: My Submission for Iron Cupcake: Earth! Stay Tuned!
Currently Watching:
Tuesday, October 13, 2009
well, hallo, cupcake!
So first, let me gush about how much I am loving this background!! Cupcakes are quickly becoming my favorite thing to make. Think about it. You've got a perfectly proportioned piece of cake, with the perfect amount of icing, and no messy cutting involved! ANNNND, it comes in its own handy-dandy wrapper! Hellooooooooo, cupcake!!
But this post isn't about cupcakes. Well, a little, but it's mainly about cake. pumpkin.
 Yup, pumpkin. Pies, especially. And bread. Pumpkin bread is deeeeelish. What could be better than both of them put together???
 A pumpkin spice cake that looks like a pumpkin. I mean, duh.
So BLT had a Oktoberfest/Halloween party this past weekend, and I (por su puesto) offered to make dessert! I had this perfect little ditty in mind and couldn't wait to make it.
neither do I! I'd rather spend my time on more important things, like decorating! And eating!
PUMPKIN SPICE CAKE
2 18 1/4 oz boxes of spice cake mix (I used Betty Crocker, but only because she was on sale. I'm not picky.)
6 eggs
1 15 oz can of solid-pack pumpkin (I think that means use real pumpkin, not pre-made pie filling.)
2/3 cup canola oil
2/3 cup evaporated milk (They didn't specify a fat content, so I used low fat. Turned out FINE.)
1 12 oz bag of vanilla chips (I used chocolate, because they taste better. Simple.)
2 cans vanilla icing (I used buttercream, again, because I think it tastes better. Also, Betty, but also because it was on sale.)
1 cup flaked coconut
food coloring
In a large bowl (AKA the bigger bowl on my mom's awesome stand mixer) I mixed the 2 cake mixes, the pumpkin, the milk, the eggs, and the oil, in no particular order. I beat them for about
30 seconds on low, then bumped it up to medium for around 2 minutes. (J asked what would happen if I threw it up to 10. I told him I'll show him in his kitchen sometime - where he can deal with the mess.) Then I mixed in the chocolate chips (a few mysteriously disappeared...) on low.
Next up, baking. First, two very greasy muffin cups each got some cakey love. Then, this lovely heirloom from Grandmom Lulu
Next up, baking. First, two very greasy muffin cups each got some cakey love. Then, this lovely heirloom from Grandmom Lulu
 got greased up and loaded with some batter. (I could only bake one half of the cake at a time, because I didn't have a matching bundt. It took FOREVERRRRRR)
Pop 'em all in the oven at 350 for around 20 minutes for the cuppies, and 40-45 for the bundt.
Then have a dance break.
Then have a dance break.
When the baking is finished, take everyone back out and let them cool. I let them cool overnight because I am incredibly impatient and knew that I would try to start icing while one or all were still warm. So I restrained myself. (Barely)
The next morning, I leveled off my cakes (which is much harder than it sounds) and smeared some buttercream on the top of one. I plopped the other bundt on top, and make sure they were sturdily held together. They were. Phew. Then, came the coloring!
On the box of the food coloring, the mixture for orange is supposed to be 12 drops of yellow to 4 drops of red. For one can of frosting. I used about 1 and 2/3, and still had to use 42 drops of yellow and 14 drops of red. So, as long as you keep the right ratio, you'll get there eventually. Once it was nice and orangey, I began icing. Toooootally harder than I originally thought, mainly because the bundt I used has many little ridges, and I had to make sure the icing got in all the
little crevices. When I was done though, it looked GOOOOOOOD. Then, I leveled off my cuppies, and plopped one of them right-side-up into the middle of the bundt, to act as a plug. I threw a little icing on there, and smooshed the other one upside-down on top of it. Perfect!
little crevices. When I was done though, it looked GOOOOOOOD. Then, I leveled off my cuppies, and plopped one of them right-side-up into the middle of the bundt, to act as a plug. I threw a little icing on there, and smooshed the other one upside-down on top of it. Perfect!
Next up: The Secret!
I love Betty Crocker. She invented this awesome little doohickey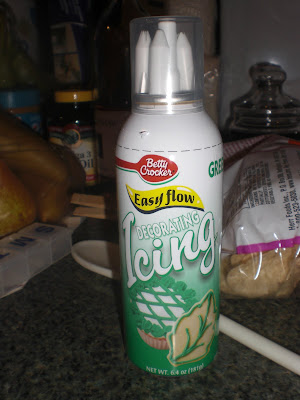
I love Betty Crocker. She invented this awesome little doohickey
which makes it impossibly easy to do icing. I just pumped a little of the icing out of the hair-mousse-like can, and smeared it all over the top cuppie for the stem. Then, I used the round tip to just make squiggly vines all around the pumpkin, growing from both the stem and the base. And then came my favorite part.
This thing has 4 different tips to use, one of which happens to be the leaf tips. Leaves are super easy and super fun to make. I'm pretty sure I had at least 3 times as many leaves on the vines as was necessary, but I couldn't help myself! Look how cute they were!
This thing has 4 different tips to use, one of which happens to be the leaf tips. Leaves are super easy and super fun to make. I'm pretty sure I had at least 3 times as many leaves on the vines as was necessary, but I couldn't help myself! Look how cute they were!

(I hate that you can see a little of the white icing peeking out the top, but hopefully you will be distracted by the adorable leaves....)
Last step was to dye a little coconut green and sprinkle around the base as grass!
Bon Ape Tit!
Next post:
12 Layer Cake!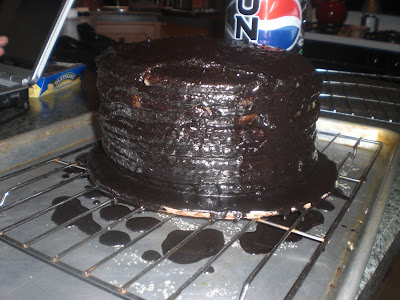
12 Layer Cake!
Friday, October 2, 2009
Giving In
So, for months, I've wondered what in the world to do with this blog. Leave it out here in the blogosphere and hope for inspiration? Shut it down? Or, sit down and decide what in the world it should be about?
Luckily, I chose option 3. Phew.
After much hemming and hawing (what a great expression!) I gave in to what everyone has been telling me and decided to start chronicling what I do best: food. Mainly, baking. (and other desserts.)
So today, I joined the Daring Bakers! It's a group of men and women who love to bake. Each month one (or two or three) of the members chooses a recipe, and sends it out to all their fellow bakers. Then, each Daring Baker works on the recipe, and all 3000 post the recipe on their blogs on the very same day. It's very secretive, and they don't tell anyone what the recipe is until the day of the big reveal.
Well, I like secrets. And adventures. And baking. So secretive adventurous baking sounds like it's right up my alley, no?
Also, there are plenty of holiday parties coming up soon (How is it October already??) so there will be plenty of other baked goodies to come as well.
Get excited!!

Subscribe to:
Posts (Atom)